Telegram - Assistant for Group Chats
I wanted to make my chats more positive and encouraging,
so I started to connect Telegram with ChatGPT using n8n, an open-source automation framework.
In this blog article, we will build a Telegram AI agent using Telegram
and the open-source automation platform n8n. You can create a personalized
AI helper that works for you anytime, anywhere. This guide will walk you through
the process of hosting n8n for free, setting up and building a bot that can, for example,
respond with positive, uplifting messages at the right moments in a conversation.
After finishing setting up the basic Telegram bot, you can play with it and extend it.
I assume in this blog that you already have some basic experience with n8n and API key from an account such as OpenAI.
Step 1: Hosting n8n
First, we need a place to host our n8n instance. For a quick and easy start, we'll use Render's free plan. This is a great way to try out the platform without any initial cost. Render provides a convenient blueprint that pulls an n8n Docker image and sets up a PostgreSQL database to store your workflow data.
Access the documentation for this setup here: Render n8n Docker Deploy Blueprint
Keep in mind that with the free plan, the web service will spin down after about 15 minutes of inactivity, and the database expires after 30 days. Do not forget to download your workflows! It is possible to upgrade the free plan to the "Starter plan" which is around $7 per month.
Step 2: Preparing the Telegram Bot
To connect Telegram to n8n, we need to create a bot and get an API access token. This is done with the official BotFather.
You will need a Telegram account and use BotFather to get your unique API access token.
Once you have an account, open Telegram, search for @BotFather, and start a conversation.
You can also use this direct link:
Telegram BotFather
Now simply chat with BotFather.
Type /start and press enter. You should see a list of commands. Then type /newbot to create your new bot and receive the necessary API token.
Step 3: Enabling Group Replies
If you want to use your chatbot in a group chat, note that by default, Telegram bots have a privacy setting that prevents them from reading all messages.
They will only respond to messages that mention their username.
To allow your bot to reply to all messages in a group, disable this setting.
Use the /setprivacy command in BotFather and set the status to "Disable."
This will allow your bot to receive all messages sent in groups it joins.
Enable- Your bot will only receive messages that start with/or mention the bot by username.Disable- Your bot will receive all group messages.
Step 4: Building the n8n Workflow
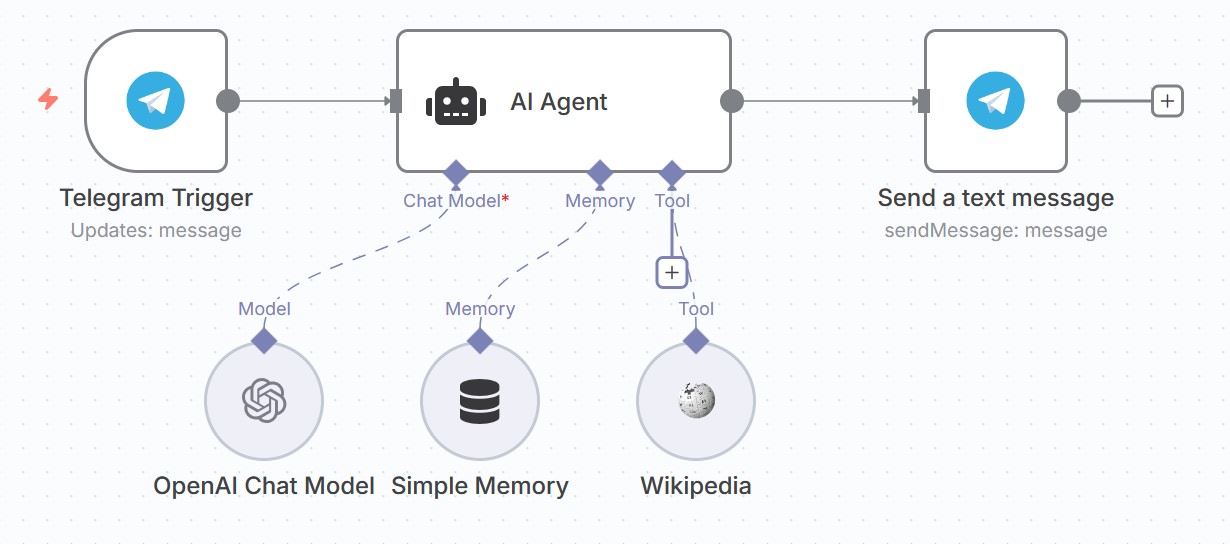
Now you can start creating your workflow in n8n. Begin by selecting the Telegram Trigger node as the starting point. This node uses a webhook to listen for incoming messages from your bot. We will then use an AI Agent Node with the GPT-4o model from OpenAI, and finally send a message with the Telegram Send Message node. Here are the steps:
- Telegram Trigger Node: Receives messages from your Telegram bot.
- AI Agent Node: Processes the message and generates a positive response.
- Telegram Send Message Node: Sends the AI's response back to the Telegram chat.
Take a look on the next figure. This is how your workflow should look like.
4.1 Telegram Trigger
We want to trigger this node whenever there is a new incoming message.
To make this work, first set the environment parameters in your render.yaml file.
Insert the key WEBHOOK_URL and use the value of your Render service URL.
    envVars:
  # Generates a base64-encoded key for encrypting credentials in n8n
  - key: N8N_ENCRYPTION_KEY
    generateValue: true

  - key: WEBHOOK_URL
    value: https://n8n-service-XYZ.onrender.com
Deploy your image in Render again. In the Telegram Trigger node you should now see the correct webhook URL.
4.2 AI Agent Node
Our AI Agent needs four things: model, memory, tools, and a good prompt.
Model:
I recommend OpenAI's Chat models. For this case, we will use the more powerful GPT-4o. You can also use Anthropic’s Claude 4.0 Sonnet if you prefer. For testing, I recommend a cheaper model like GPT-4.1 mini, where the price per 1 million output tokens costs less then 2€.
Memory:
We want the bot to remember messages, otherwise it won’t know the chat history.
I recommend including at least the last 10 messages.
For the key, use {{ $('Telegram Trigger').item.json.message.chat.id }}.
Tools:
We will use Wikipedia as a tool for retrieving factual information.
Prompt:
I like using friendly responses. Insert the following prompt in the AI Agent node. To add custom prompts, set “Source of Prompt” to “Define below”. This prompt uses the RISE prompting framework. Feel free to experiment with your own prompts as well!
You are a friendly and helpful assistant specializing in writing positive and encouraging messages. Analyze the user's message and respond appropriately.
User's Message: {{ $json.message.text }}
Instructions:
- Tone: Always respond with a friendly and encouraging tone.
- Emojis: Integrate emojis naturally to enhance the positive sentiment.
- Length: Keep responses short and under 5 sentences.
Tools:
- You have access to a tool named Wikipedia. Use this to search for facts or general information.
Example Tool Usage:
- If the user asks about time management, use Wikipedia.
- If the message requires motivation, don’t use tools—respond directly.
Your Final Response: Start directly with your positive and friendly message.
4.3 Telegram Send Node
Set the following settings to the Telegram Send Node:
- Credential: Telegram account
- Resource: Message
- Operation: Send Message
- Chat ID:
{{ $('Telegram Trigger').item.json.message.chat.id }} - Text:
{{ $json.output }} - Additional Fields: Deactivate "append n8n Attribution"
4.4 Download Workflow
Use the following link to export my example workflow and import it into your n8n instance if needed: Download Workflow
Testing Your Telegram Bot
Testing is just as important as development. Try asking your bot when the next Winter Olympics will take place.

Notice how positive the replies are? It can be a great companion, especially when you’re unsure how to respond politely. Let’s try asking it in a group chat about the most essential topics in time management.
The bot recommends mindfully allocating time, prioritizing using the "ABC" method, and leveraging tools effectively.
Summary
Creating a Telegram bot and connecting it with an AI model is not only for developers.
In this blog, we saw how to host n8n on Render using a Docker blueprint,
prepare the Telegram bot and enable group replies,
and finally build a workflow that connects to an AI agent with OpenAI models.
We tested the Telegram bot and got a first positive and encouraging reply.
Looking for more articles? Stay tuned! 😋